Making iOS Music Apps with Pure Data (libpd) and Swift
iOS Swift PureData libPD AudioProgrammingPure Data is an open source graphical programming language for real-time audio, video and graphical processing. Since the releases of a C library (and wrapped in Objective-C for iOS) a few years back, numerous applications such as RjDj, Ninja Jamm etc. have been released utilizing the library.
One of the library’s main benefits over traditional c++ audio signal processing or using Core Audio is that all the audio signal processing can be built graphically and easily tested using the Pure Data application.
Building such an app, however, requires adding libraries to the project and updating some complier settings which can be tricky. Luckily this May Rafael Hernandez uploaded a great series on how to create a basic iOS app utilizing libpd. In this tutorial I will expand on that with updates for Xcode 7 and how to bridge between Objective-C and Swift.
Requirements
- OSX running 10.10.5 or later and Xcode 7
- Basic Pure Data and Swift knowledge
Step 1
Clone the git hub repository as per Rafael’s detailed instructions here. It actually doesn’t matter where you clone this library to but we will need to know the full path for Step 4.
Step 2
In Xcode 7, create a new single view application using Swift as the default language. Copy pd-for-ios/libpd/libpd.xcodeproj into your project. Now go to Build Phases of your project and select libpd-ios as a target dependency and AudioToolbox, AVFoundation and libpd-ios as a linked library.
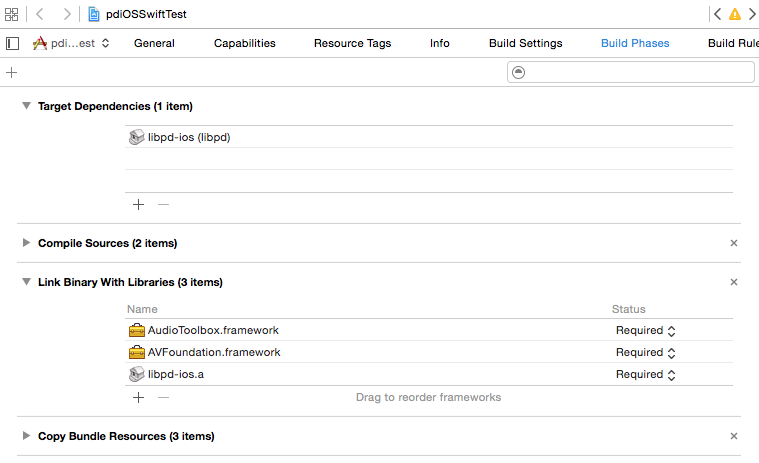
Note that, unlike in Xcode 6, libpd-ios.a isn’t highlighted in red (as per Rafael’s video) but nevertheless there is a non-displayed issue that the objective-c pd headers cannot be located. We’ll solve this in step 4.
One thing you’ll notice is that there are loads (over 180) warnings from the libpd project. To suppress these warnings, go to build settings of the libpd project and under other warning flags of custom compiler flags, simply add “-w”:

Now in the errors and warnings panel, you should be just left with a recommendation from Xcode to update libpd’s project settings (which again is optional).
Step 3
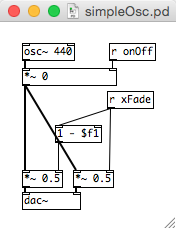
Now lets create a very basic pure data patch. This will be a sine wave oscillator of 440Hz which we can switch on and off, and which can be spatialized from left to right.
Step 4
Because the pd-for-ios library is wrapped in Objective-C and we wish to write our app using Swift, we need to create a bridge header so that we can access these Objective-C classes in Swift. Create a header file named [MyProjectName]-Bridging-Header.h
#import "PdAudioController.h"
#import "PdBase.h"
and go to the build settings of your project and make sure the Objective-C Bridging Header build setting under Swift Compiler - Code Generation has a path to the header (full info in the apple docs). Now we can add all our imports to this header.

As eluded to in Step 2, the project will still fail to compile cause Xcode cannot find these header files. There are two ways of solving this. Firstly you could update the [MyProjectName]-Bridging-Header.h file to include the actual full path to the headers
#import "[Path to pd-for-ios]/libpd/objc/PdAudioController.h"
and so forth, or you can go to build settings of the iOS project and supply a user header search path. This is the full path to pd-for-ios (within quotation marks) and the option recursive selected, or a relative path (as below) from the Xcode project to the pd-for-ios folder.

Step 5
Next thing we want to do is to create our user interface. This consists of a UISwitch to turn the sine wave on and off, and a UISlider to spatialize from left to right. By default, this UISlider returns a float value from 0.0 to 1.0, while UISwitch returns a true/false value.

Step 6
Now we need to use the pd audio engine inside our app, load our pd patch and connect the UI events to our pd patch. In ViewController we define a PdAudioController and initialize this. Once the engine has successfully been initialized, we load our pd file and turn the dsp engine on.
class ViewController: UIViewController
{
  let pd = PdAudioController()

  override func viewDidLoad()
  {
    super.viewDidLoad()

    let pdInit = pd.configureAmbientWithSampleRate(44100, numberChannels: 2, mixingEnabled: true)
    if pdInit != PdAudioOK
    {
      print( "Error, could not instantiate pd audio engine" )
      return
    }

    PdBase.openFile("simpleOsc.pd", path: NSBundle.mainBundle().resourcePath)
    pd.active = true
  }
}
Now we can create methods to handle user interaction and send messages back to our pd patch. Add the following methods to ViewController and link them to the ui objects in storyboard.
@IBAction func onOffSwitchToggled(sender: UISwitch)
{
  PdBase.sendFloat( Float(sender.on), toReceiver: "onOff" )
}

@IBAction func crossFadeSliderMoved(sender: UISlider)
{
  PdBase.sendFloat( sender.value, toReceiver: "xFade" )
}
Step 7
Now lets run the application and see it in all it’s glory! (if you want to run the application on your own device, you need an Apple developers account).
Where to go from here?
Well it is true that the initial momentum that the project had in 2012 has somewhat died out, but Pure Data is still one of the best open source audio engines there is, and as you can see from the above code, it is very easily to incorporate it within an iOS app.
Moreover, there is an ofxPd addon for openFrameworks which makes the process of integration pd into an iOS app even easier. oF should be releasing the long awaited version 1.0 soon.
Make sure you develop your patches with the vanilla version of Pure Data (which libpd is derived from) as any externals in Pd Extended are included by default in libpd.