Making iOS Music Apps with AudioKit (Csound) and Swift
iOS Swift AudioKit Csound AudioProgrammingFollowing on from yesterday’s quick tutorial on integrating Pure Data (libpd) into iOS applications coded in Swift, today we will look at AudioKit, an open-source Csound-based audio library whose goal is to be the easiest possible audio platform for musicians and developers to adopt.
Csound is an open-source C-Based Audio Programming Language which enjoyed popularity throughout the late eighties and nineties. In 2012 the Csound library was released for iOS, and long-time developer Richard Boulanger subsequently created Boulanger Labs and has released some Csound-based apps to the Apple App Store.
Although AudioKit is completely code based and thus lacks a graphical environment for prototyping instruments and effects, it does sport an Objective-C playground mode in which blocks of code can be tested in real time with audio and visual feedback. A nice introduction video can be seen here. As AudioKit supports both Objective-C and Swift, it would be nice if this playground feature is rolled out to support both Swift also. I’m sure the AudioKit team must be considering this cause as far as I know, there is no performance benefit in writing (audio) code in Objective-C over Swift.
Requirements
- OSX running 10.10.5 or later and Xcode 7 (but should work on Xcode 6 too)
- Basic Csound and Swift knowledge
Step 1
Download or clone either the stable master version or the in-progress development version.
Step 2
In Xcode 7, create a new single view application using Swift as the default language. Copy AudioKit/AudioKit.xcodeproj into your project.
At this point we need to choose between the static and dynamic libraries. The static library is easier to incorporate within projects, but requires that all projects utilizing it are open source. The dynamic library may be utilized for commercial or closed-source apps, but is only iOS 8+ compatible. For this tutorial we will go with the static library. Full instructions for the dynamic library here.
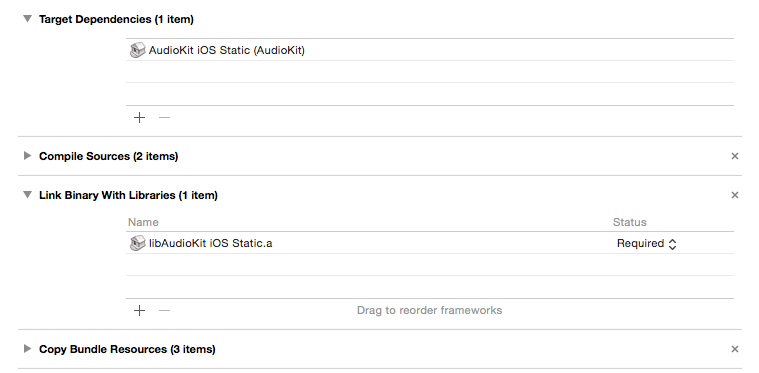
Now go to Build Phases of your project and select AudioKit iOS Static as a target dependency and libAudioKit iOS Static.a as a linked library.
Next go to the build settings for the iOS project and set Other Linker Flags to -ObjC

and point the User Header Search Paths to the location of the AudioKit directory with the option recursive selected. This can either be the full path (within quotation marks) or a relative path (as below) from the Xcode project to the AudioKit folder.

Finally, because the AudioKit library is wrapped in Objective-C and we wish to write our app using Swift, we need to import AudioKit/Platforms/Swift/AudioKit.swift to our project and create a bridge header so that we can access these Objective-C classes in Swift.
Create a header file named Bridging-Header.h1
#import "AKFoundation.h"
and go to the build settings of your project and make sure the Objective-C Bridging Header build setting under Swift Compiler - Code Generation has a path to the header.

Step 3
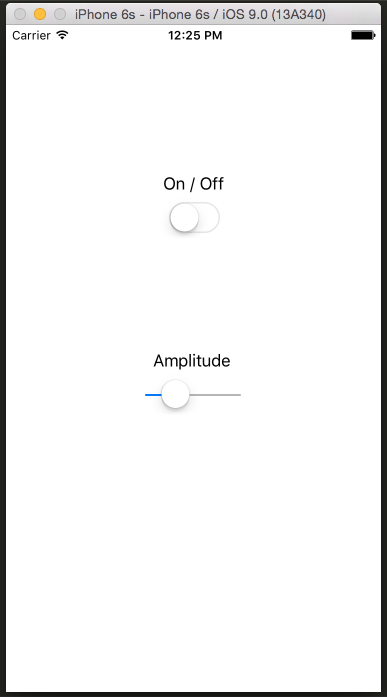
Next thing we want to do is to create our user interface. This consists of a UISwitch to turn the sine wave on and off, and a UISlider to change the volume. By default, this UISlider returns a float value from 0.0 to 1.0, while UISwitch returns a true/false value.
Step 4
Now we need to use the AudioKit engine inside our app and connect the UI events to this engine. In ViewController we define an AKInstrument and an AKInstrumentProperty which will serve as our amplitude. This amplitude property is added to the instrument. Next we create an AKOscillator which is a sine wave at 440Hz and has an amplitude governed by the amplitude instrument property. Finally we add the instrument to our orchestra.
class ViewController: UIViewController
{
  let instrument = AKInstrument()
  let amplitude = AKInstrumentProperty(value: 0.25, minimum: 0.0, maximum: 1.0)

  override func viewDidLoad()
  {
    super.viewDidLoad()

    instrument.addProperty(amplitude)

    let oscillator = AKOscillator(waveform: AKTable.standardSineWave(), frequency: akp(440), amplitude: amplitude)
    instrument.setAudioOutput(oscillator)

    AKOrchestra.addInstrument(instrument)
  }
}
Now we can create methods to handle user interaction. Add the following methods to ViewController and link them to the ui objects in storyboard.
@IBAction func onOffSwitchToggled(sender: UISwitch)
{
  ( sender.on ? instrument.play() : instrument.stop() )
}

@IBAction func crossFadeSliderMoved(sender: UISlider)
{
  amplitude.value = sender.value
}
Step 5
Now lets run the application and see it in all it’s glory! (if you want to run the application on your own device, you need an Apple developers account).
libpd vs AudioKit
Although I am familiar with Csound, this is actually my first time using AudioKit. Personally I’m very impressed with the ease of incorporating AudioKit within an iOS (or OSX) project and love the well documented API and Apple-style easy to read methods. The project is clearly much more than Csound in a new dress and for creative coders and techy musicians well worth checking out.
Musicians and artists, however, will still find the graphical environment of Pure Data more welcoming. That being said, unlike libpd, AudioKit is in active development, and that is a huge plus. Moreover, the aforementioned documentation and installation are both much more user friendly. The Csound audio library is also famous for it’s audio quality, especially time stretching.
Overall I’m intrigued by AudioKit and I feel that it has a bright future not only as a leading open-source iOS audio library, but potentially even as an alternative to Core Audio for game developers.
Footnotes
1 Although the Apple Docs state that the Bridging header should be named [MyProjectName]-Bridging-Header.h, as this Bridging header is constant between projects using AudioKit, and because we need to set the header location manually anyway, it makes sense to simply name it Bridging-Header.h and reuse it between projects.